Things To Do With Kids To Celebrate Chuseok: Arts, Crafts, & Cooking!
Last Updated on December 20, 2024
Chuseok, or the Korean Thanksgiving, is a national holiday that is celebrated in Korea. Families everywhere migrate across the country to head to their parents’ or grandparents’ home to partake in a feast to thank ancestors and remember those that came before. It’s a special time and for traditional families like mine, we hold Jesa, an ancestral rite, eat, and then play traditional games together.
Some years we just stay in Seoul though too and there’s a lot to do for Chuseok even when we stay in Seoul. Wherever you’re celebrating, here are some things you can do with kids for Chuseok.
If you’re staying home for Chuseok, or abroad and want to celebrate, there are a lot of things you can do with kids from crafts to cooking that can help them appreciate Korean heritage and culture and learn about the holiday.
Here are some ideas of ways you can give your children the opportunity to learn about Chuseok through arts and cooking.
- Yut Nori (윷놀이)
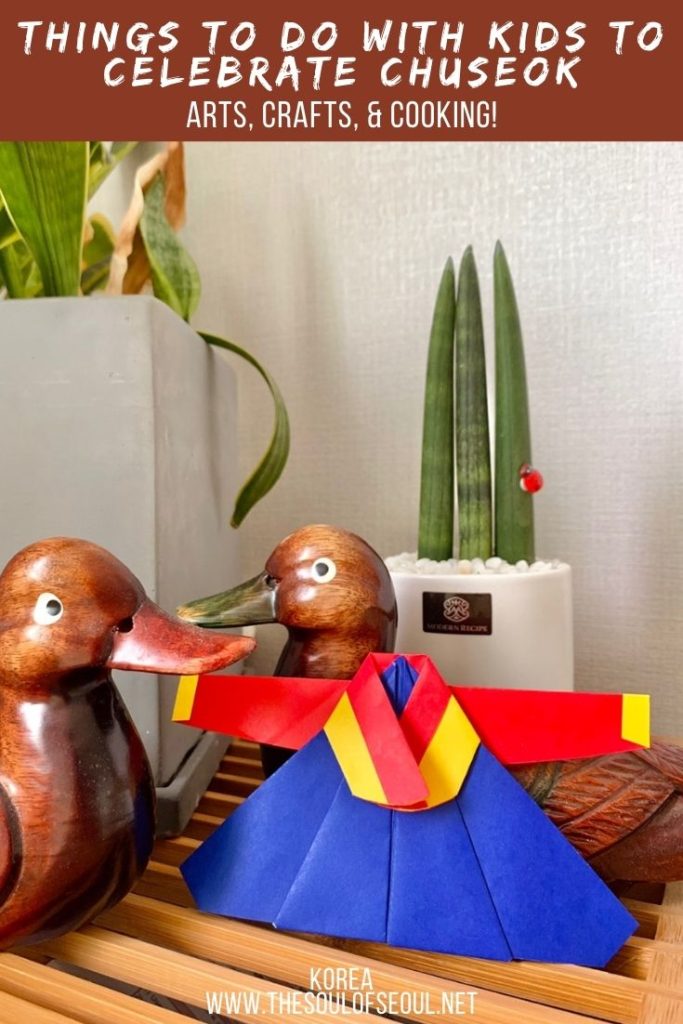
- Origami Hanbok
- Songpyeon (송편)
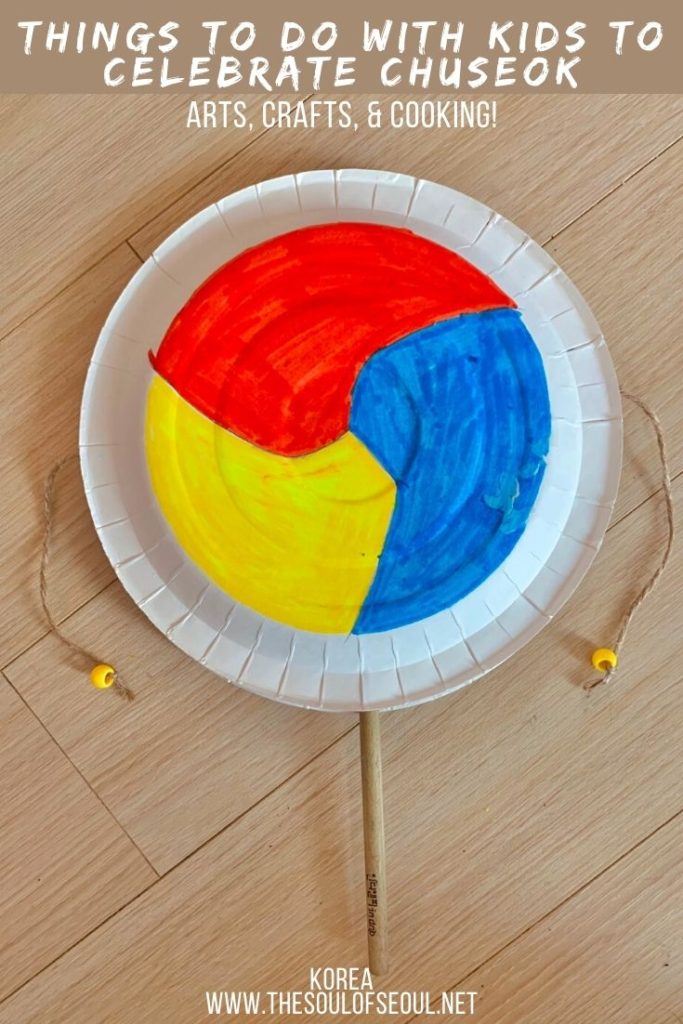
- Make A Korean Paper Plate Drum
- Make a Traditional Korean Fan
(This post contains affiliate links, which means I receive a certain percentage of a sale if you purchase after clicking at no cost to you. Thank you for your support.)
Play Yut Nori (윷놀이)
Yut Nori, sometimes spelled Yunnori, is a traditional Korean board game often played on the holidays. The origins of the game may go as far back as the Three Kingdoms Period in Korea (57BCE – 668CE) however it’s still unclear exactly where the game came from. Suffice to say it’s old and is the thing to do on traditional holidays in Korea. Mostly commonly played on Seollal, or the Lunar New Year, it’s not uncommon to see it played on any traditional holiday or social event.
Do note that below are the basics of the game. There are some special rules that can also be played and if different families either play them or not. This is all you need to know for the basics though. If you want to learn more, read this guide to how to play yut nori including the extra rules to make it more fun.
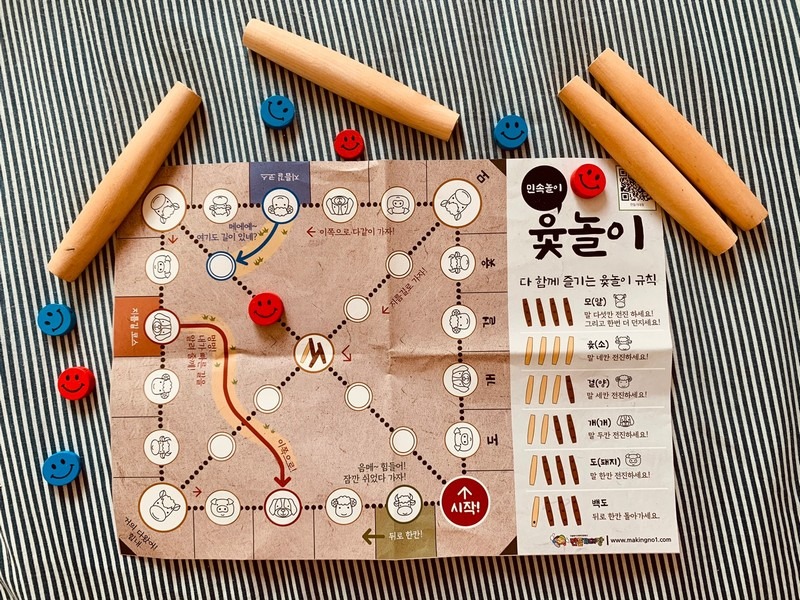
What you need
You can definitely make a board and find playing pieces in your house, but the yut sticks are quite specific and should have one flight side and three rounded sides. If you have time, I’d suggest just buying a set online. There are great Yut Nori games for good prices available on Amazon.com. Here is what you need for the game:
- Board / Malpan 말판: This is usually made with stitched cloth but you can also just use a printed board on paper or in a pinch, you can just draw your own.
- There are four straight courses and two diagonal ones. Each of the straight courses comes with five stations, the diagonal ones have five stations, too, but one is shared. This brings the number of stations to twenty-nine in total. The board is also known to sometimes be drawn onto the floor.
- Yut Sticks: You need four.
- Yut Sticks are rounded on three sizes and flat on one side. The way to determine the score of the throw is by counting that sticks that are up (flat side up) or under (round side up).
- Small Tokens / Playing Pieces 말: Four tokens per person/team. You can use everything from coins, buttons, and pebbles to chess pieces or other board game pieces as long as they are clearly distinguishable.
Scoring in Yut Nori
If you’re learning Korean animals or teaching your kids Korean, then this is a great way to learn them as the scoring is based on animals! Here’s how it works:
- Pig/도: One stick up (flat side up) and three sticks under (round side up). = Move 1 space.
- Dog/개: Two sticks up (flat side up) and two sticks under (round side up). = Move 2 spaces.
- Sheep/걸: Three sticks up (flat side up) and one stick under (round side up). = Move 3 spaces.
- Cow/윳: Four sticks up (flat side up). = Move 4 spaces + Player can go again.
- Horse/모: Four sticks under (round side up). = Move 5 spaces. + Player can go again.
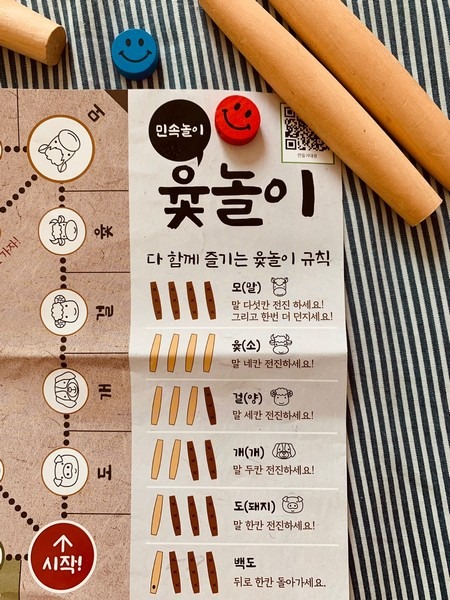
How to play Yut Nori
- The start of the game is determined by each player/team throwing the sticks once. The player/team with the most points begins the game.
- Each player/team then casts the sticks once per turn, moving the playing pieces around the board with each turn. Players that throw a Cow/윳 or Horse/모 get to throw again. There is no limit to the number of times a player can continue to throw if they continue to get a Cow or Horse.
- Each turn can be used to place a new playing piece on the board or to move an existing one but the score can not be split between the playing pieces. This means, if you get a Sheep/걸, you cannot move one piece 1 space, and then move another piece 2 spaces. Playing pieces can only move forward and cannot move backwards on the board. Paths to move around the board are shown above.
- If a playing piece lands on a space where the other team has an existing playing piece, the opponent’s playing piece is removed and returns back to the starting position. In this case, the current player also gains one more turn to throw the Yut Sticks as well.
- If a playing piece lands on a space where your own piece is already sitting, your playing pieces now form a group and travel together throughout the rest of the game. This is both good and bad as you can finish faster if you make it to the the end, but if the opponent lands on that space, then two playing pieces are removed in one turn.
- The game is one when one players brings all of their playing pieces home again. Pieces must go beyond the starting point though, not just land on it.

Make An Origami Hanbok
A Hanbok (한복) the traditional Korean dress worn at weddings, on traditional holidays, and to ceremonies. If you’ve got a child with some nimble fingers, this is a great time to learn how to make an origami Hanbok.
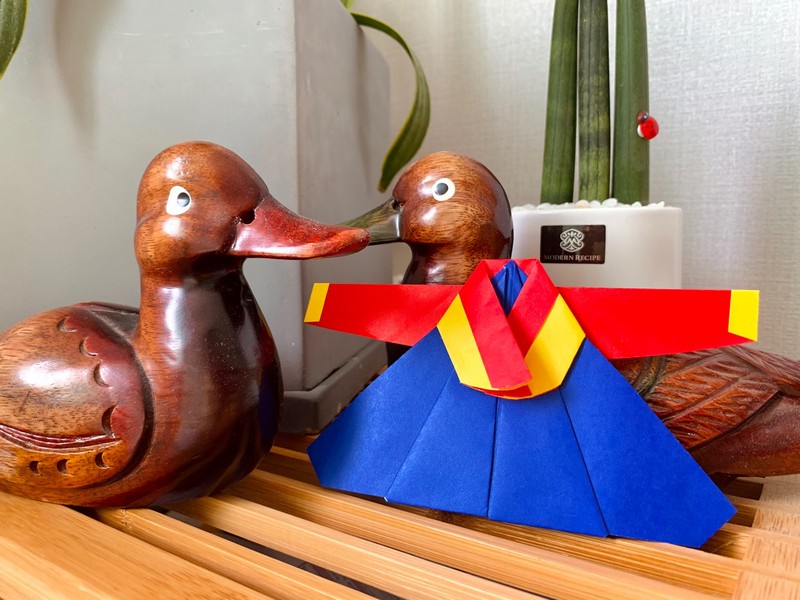
What you need
- 6X6 inch paper (you can buy origami paper or just cut some down to size)
- scissors
- glue
- ruler
How to make the origami Hanbok
Create The Skirt
Here are some written directions but I’m a very visual person, especially with origami, so I suggest watching and following the directions in the video above.
- Fold the paper in half both ways and then open it again and fold the paper so that the corners touch both ways so you end up with four folds when you open back up to flat.
- Grab the two corners and fold in to create a mini triangle.
- One one side, grab the corners and fold them in to the center against the middle crease.
- Fold the flaps that are overhanging in the front inside so the bottom of the skirt is straight.
- Flip the entier thing over and fold the corners up to form mini-triangles. Then fold them inside so the ends of the skirt curve up.
Create The Top
- Fold another square in half and then cut the paper along that line so you have a rectangle. Keep both rectangles.
- Fold the bottom up a millimeter and then up again another centimeter.
- Fold back and forth like a fan into three parts.
- Unfold and then fold the piece in half to create a crease in the middle.
- You need to take the scissors and cut on the first crease a couple inches in but not completely through.
- Unfold and put the skirt in the center and fold the two top flaps inward to create the Hanbok top.
- Fold the other long flap upward in back to create the arms.
- Cut a curve into the front part of the Hanbok and on the sleeves.
- Finally glue the top to the skirt.
Make Songpyeon (송편)
Songpyeon is a sweet and chewy rice cake that can be eaten anytime but is eaten on Chuseok most definitely and traditionally made with the rice from that years’ crop.
The Songpyeon celebrates the harvest and is a wish for everyone’s good health. Usually they come in various colors like a dark green, pink, yellow, and white. Each one is slightly different and you can even use different fillings.
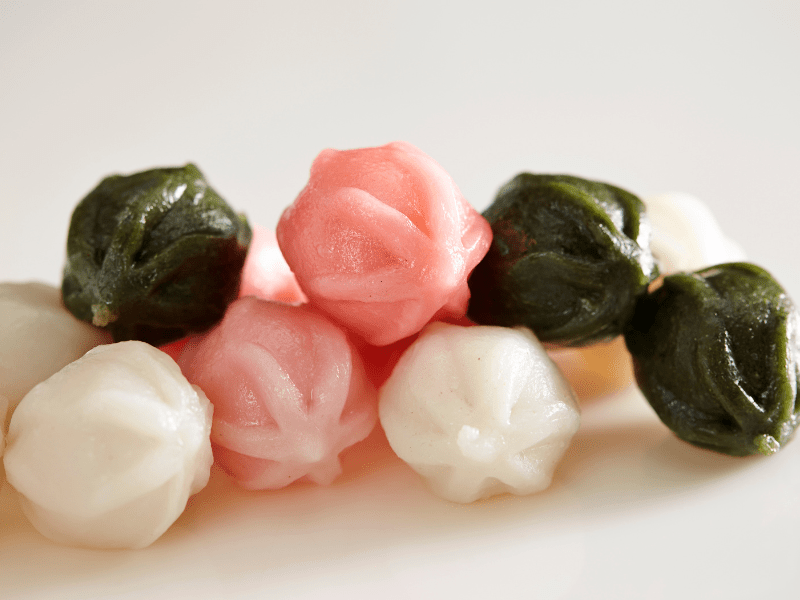
Personally, I like them a bit sweeter so I enjoy the ones with sweet honey sesame or mungbeans that have been steam with sugar. Usually what the schools do when having the kids make songpyeon, the teachers make the dough first and then help the kids insert the filling and fold them over and then even decorate them.
If you’ve got older kids or a child like mine who loves cooking and is often found in the kitchen using her Raddish Kids Cooking subscription, you can let them enjoy the whole process. But, with younger ones, just let them work on the fillings and the decorations to get involved.
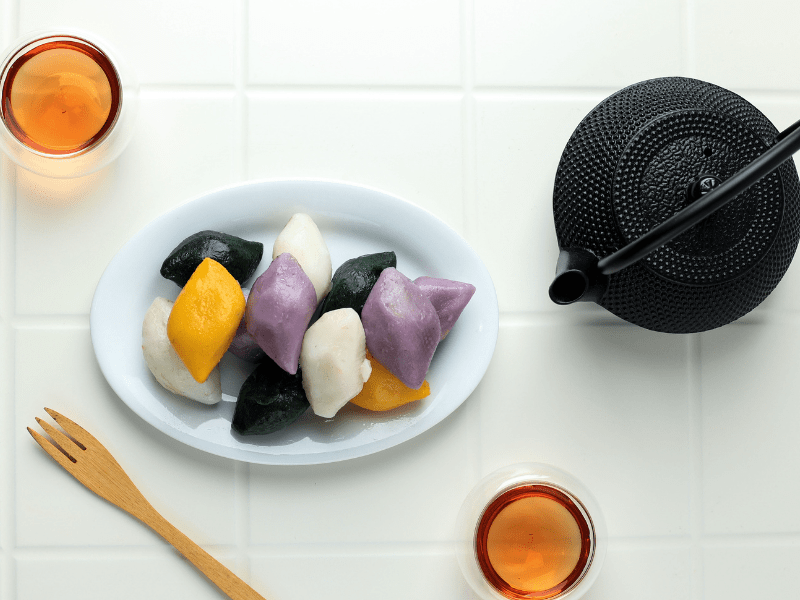
Two sites that we use for most of our Korean cooking and learning have great Songpyeon recipes, videos, and descriptions, so I’ll just let them do the talking.
Make A Korean Paper Plate Drum
Often when you head to the traditional sites around the country over the holiday period, there will be various staff dressed in traditional clothing with games and activities for the children to partake in. Often there are musical instruments and drums are one of them.
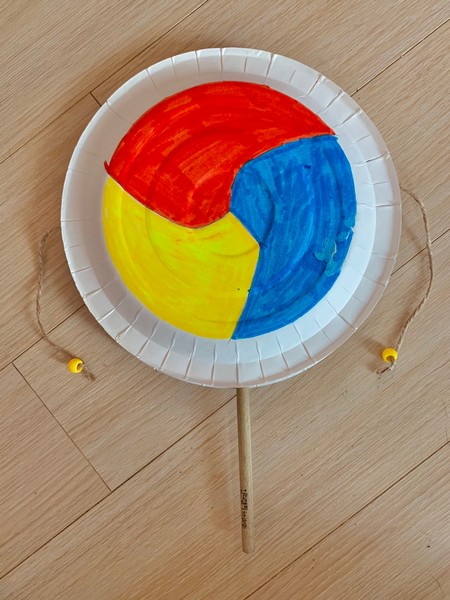
You can make this paper plate drum right at home and help your children learn about the Taegeuk, or Korean flag. In this variation, the colors are red, blue, and yellow which represent earth, heaven, and humanity.
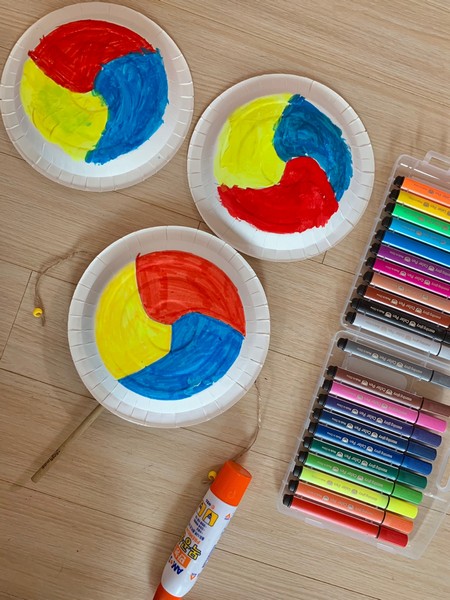
What you need
- 2 paper plates (preferably biodegradable)
- a pencil
- acrylic paint
- paint brush
- string
- scissors
- glue
- beads or bells
- wooden chopstick or stick
How to make a Korean Paper Plate Drum
- Draw the Taeguk symbol on the back of one of the paper plates. If you’ve got older children, allow them to try it themselves after looking at a picture of one. If you’ve got younger kids, I suggest doing this before they come to craft.
- Paint each part of the symbol with red, blue, and then yellow.
- Glue the wooden chopstick, which are prevalent in Korea, but if you don’t have one, just get a stick, on the front side of the plat and then glue a string on either side of the inside of the plate.
- Glue the other plate on top so the stick and string are inside and can’t be seen.
- Put beads or bells onto the ends of the string and tie them.
- Let dry.
After it has dried, the kids can roll the stick between the palms of their hands back and forth to create the drum effect.
Make a Traditional Korean Fan
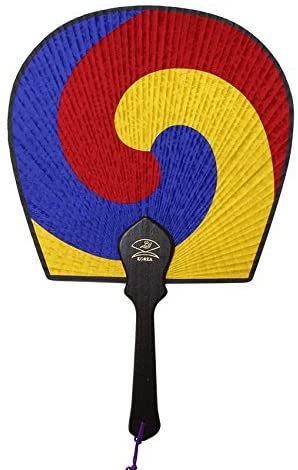
You will see these in every traditional souvenir shop that lines streets in Insadong but you can make your own right at home! This is a super easy craft to do with kids that are younger.
Just let them color or paint the design and then paste it on to some popsicle sticks. As mentioned above, the colors are red, blue, and yellow which represent earth, heaven, and humanity.
What you need
- Cardboard (Cereal boxes work great)
- Scissors
- Glue
- Markers OR Paint
- Large Craft Stick or Large Popsicle Stick
How to make a Traditional Korean Fan
- First cut the cardboard into the proper shape. It should be flat on the bottom and then curve up and around as seen in the picture above.
- Make an outline of the curves so you know where to paint or color. If you’re coloring, you may want to glue a piece of white paper on the cardboard so the colors can be more vibrant
- Paint or color the red, yellow, and blue sections.
- Glue the popsicle stick to the back and let dry.
- Fan Fan Fan yourself.
Did you like this post? Pin It!
